menampilkan data dari JTable Ke JTextfield ketika datanya kita klik menggunakan mouse
int row = jTable.GetselectedRow();
txt1.setText(jTable.GetModel().getValueAt(row,0).toString());
Tutorial JavaSE, JavaME, JavaEE, Android, Netbeans, Eclipse, Mysql Bahasa Indonesia
Mendapatkan Data Cell JTable
In this tutorial, you will learn how to get the cell
values in a JTable component. It is a same as setting the cell values in
a JTable. If you want to set the cell values, use the setValueAt() method
and want to get the cell values, use the getValueAt() method that
establish the values of the specified position.
Description of program:
This program helps you to get the cell values in a JTable. This program creates a JTable that contains some data and columns with column header and yellow background color. Here, a GetData() method returns an object at a specified position by applying the pre-defined getValueAt() method. This method returns the cell value at a specified row and column position in JTable. The cell values display in the command line.
Description of code:
getValueAt(int row_index, int col_index):
This is the method that returns the object at specified row and column position. It takes the following arguments:
row_index: This is the index of row, which value has to be retrieved.
col_index: This is the index of column, which value has to be retrieved.
Here is the code of program:
Output of program:

Description of program:
This program helps you to get the cell values in a JTable. This program creates a JTable that contains some data and columns with column header and yellow background color. Here, a GetData() method returns an object at a specified position by applying the pre-defined getValueAt() method. This method returns the cell value at a specified row and column position in JTable. The cell values display in the command line.
Description of code:
getValueAt(int row_index, int col_index):
This is the method that returns the object at specified row and column position. It takes the following arguments:
row_index: This is the index of row, which value has to be retrieved.
col_index: This is the index of column, which value has to be retrieved.
Here is the code of program:
import javax.swing.*;
|
Output of program:

Menampilkan Data ke JTable
Cara menampilkan data ke dalam JTable Java Netbeans itu sangat mudah kok. mudah banget malah. sambil nutup mata juga bisa kok. ahahaha. Simak nich tutorial berikut ini
tutorial lain yang lebih mudah dan detail tentang Cara menampilkan data ke dalam JTable sudah saya siapkan. silahkan klik disini

In this example, i am using an MS Access database and created a table called employee. This table contains fileds empid, name, position and department. Some sample data was added too.
Let’s follow the steps to do it:
Step 1: Create the table in MS Access and make sure you put the database file inside your NetBeans Project Folder.
Step 2: Create database engine to retrieve data from the Access table:
Create a class called DBEngine to retrieve the data from Access (Make sure you had created a new NetBeans Project first for this tutorial) Note: i used project.engine package for example only. You are free to create yours.

The following code is done in the DBEngine.java. Basically its a class to retrieve all the data from Employee table using JDBC.

Create a new JFrame Form

I named the class TableExample and created under project.gui package.

Add a JTable component onto the Frame.
Step 4: After inserting the JTable component, switch to Source view, we need to insert coding to retrieve data from database.

Add a JTable component onto the Frame.
Step 5: Add the following codes as shown below.
Code you need to add are:
line 03 and 04 (import packages)
line 12 and 13 (instantiate two Vector objects, to hold table data and table header)
line 16 (add throws Exception)
line 19 to 27 (to populate data from database into the Vector object and also initialize the table header Vector object)

Choose customize code option to customize the codes.
The customize code page will be shown as follow:

Customize code page
Step 7: change the default code into custom property and change the code as follow:

change the codes to let the table to populate the Vector object we created just now.
Step 8: you need to update the main method to handle exception using try… catch block
Search for the main method in the code view and modify it with adding try…catch block as shown follow:

Output:
Table populated with data from database.
tutorial lain yang lebih mudah dan detail tentang Cara menampilkan data ke dalam JTable sudah saya siapkan. silahkan klik disini
tutorial lain yang lebih mudah dan detail tentang Cara menampilkan data ke dalam JTable sudah saya siapkan. silahkan klik disini

In this example, i am using an MS Access database and created a table called employee. This table contains fileds empid, name, position and department. Some sample data was added too.
Let’s follow the steps to do it:
Step 1: Create the table in MS Access and make sure you put the database file inside your NetBeans Project Folder.
Step 2: Create database engine to retrieve data from the Access table:
Create a class called DBEngine to retrieve the data from Access (Make sure you had created a new NetBeans Project first for this tutorial) Note: i used project.engine package for example only. You are free to create yours.

The following code is done in the DBEngine.java. Basically its a class to retrieve all the data from Employee table using JDBC.
package project.engine;

import java.sql.Connection;
import java.sql.DriverManager;
import java.sql.PreparedStatement;
import java.sql.ResultSet;
import java.util.Vector;

/**
*
* @author cgg
*/
public class DBEngine
{
/**
* Connect to database
* @return Connection to database
* @throws java.lang.Exception
*/
public Connection dbConnection()throws Exception
{
Class.forName("sun.jdbc.odbc.JdbcOdbcDriver");
String myDB ="jdbc:odbc:Driver={Microsoft Access Driver (*.mdb)};DBQ=pay.MDB";
return DriverManager.getConnection(myDB,"","");
}

/**
* This method will load vector of vector of string and load all the data in
* the vector
* @return vector of vector of string
* @throws java.lang.Exception
*/
public Vector getEmployee()throws Exception
{
Vector<Vector<String>> employeeVector = new Vector<Vector<String>>();

Connection conn = dbConnection();
PreparedStatement pre = conn.prepareStatement("select * from employee");

ResultSet rs = pre.executeQuery();

while(rs.next())
{
Vector<String> employee = new Vector<String>();
employee.add(rs.getString(1)); //Empid
employee.add(rs.getString(2)); //name
employee.add(rs.getString(3)); //position
employee.add(rs.getString(4)); //department
employeeVector.add(employee);
}

/*Close the connection after use (MUST)*/
if(conn!=null)
conn.close();

return employeeVector;
}
}
Step 3: Now create the GUI with a JTable component inside it.
Create a new JFrame Form

I named the class TableExample and created under project.gui package.

Add a JTable component onto the Frame.
Step 4: After inserting the JTable component, switch to Source view, we need to insert coding to retrieve data from database.

Add a JTable component onto the Frame.
Step 5: Add the following codes as shown below.
Code you need to add are:
line 03 and 04 (import packages)
line 12 and 13 (instantiate two Vector objects, to hold table data and table header)
line 16 (add throws Exception)
line 19 to 27 (to populate data from database into the Vector object and also initialize the table header Vector object)
package project.gui;

import java.util.Vector;
import project.engine.DBEngine;

/**
 *
 * @author  cgg
 */
public class TableExamples extends javax.swing.JFrame {

    private Vector<Vector<String>> data; //used for data from database
    private Vector<String> header; //used to store data header

    /** Creates new form TableExamples */
    public TableExamples() throws Exception{

        //get data from database
        DBEngine dbengine = new DBEngine();
        data = dbengine.getEmployee();

        //create header for the table
        header = new Vector<String>();
        header.add("EmpID"); //Empid
        header.add("Name"); // employee name
        header.add("Position"); // employee position
        header.add("Department"); // employee department

        initComponents();
}
.
.
.
.
Step 6: switch back to design view and right click on the JTable component, then select the Customize Code button.
Choose customize code option to customize the codes.
The customize code page will be shown as follow:

Customize code page
Step 7: change the default code into custom property and change the code as follow:

change the codes to let the table to populate the Vector object we created just now.
Step 8: you need to update the main method to handle exception using try… catch block
Search for the main method in the code view and modify it with adding try…catch block as shown follow:
/**
    * @param args the command line arguments
    */
    public static void main(String args[]) {
        java.awt.EventQueue.invokeLater(new Runnable() {
            public void run() {
                try
                {
                    new TableExamples().setVisible(true);
                }catch(Exception e){e.printStackTrace();}
            }
        });
    }
Step 9: now build and run the project or the file, you should be able to get the following output:
Output:
Table populated with data from database.
tutorial lain yang lebih mudah dan detail tentang Cara menampilkan data ke dalam JTable sudah saya siapkan. silahkan klik disini
Java MySQL JDBC Tutorial using NetBeans Part 2
n first part, we have already established
connection to MySQL using Java. Now, we will discuss about how to
modify the record of the database from program we make.
Make sure that you have read the previous part of the tutorial. In this tutorial, we will use Project that we have created in previous tutorial and Statement interface from java.sql.Statement.
First we must have a database and a table in MySQL. For example, we create a database school with attribute name and number (student number). Start your MySQL and make such database and table using this command :
create database school;
use school;
create table student (name varchar(30), number int);
Set student number to be the primary key on this table:
alter table student add constraint primary key (number);
After finishing with database, we move to our Java program.
In Statement interface, we can execute
any SQL statemnt using our Java program. First, make a class named
Sqlstatement in our previous tutorial Project. The content of
Sqlstatement.java is :
package javasql;
import java.sql.*;
/**
 *
 * @author ferdiansyah.dolot
 */
public class Sqlstatement {
    private Statement statement;
    public Sqlstatement() throws SQLException{
        makeStatement();
    }
    public Statement makeStatement() throws SQLException{
        Connect c = new Connect();
        Connection conn = c.makeConnection();
        statement = conn.createStatement();
        return statement;
    }
    public void insert(String nama,int npm)throws SQLException{
        statement.execute("insert into student values(\""+name+"\",
                          "+number+")");
    }
    public static void main(String arg[]){
        try {
            Sqlstatement s = new Sqlstatement();
            s.insert("Ferdi",1);
            s.insert("Anca",2);
            System.out.println("Success");
        }
        catch(SQLException e){
            System.out.println("Failed");
            e.printStackTrace();
        }
    }
}
In class above, we use the Connect class that we have created in previous tutorial.
On this part :
statement = conn.createStatement();
Variable conn is instance of Connect class that we have made in the previous tutorial. After the connection has estabished, the conn call method createStatement(). The method returns Statement that we will use to send SQL statements to database.
To execute any SQL statement using our Java program, we use execute(String sqlstatement) in interface Statement. In our program above, the execution of the SQL statement can be seen on this part :
statement.execute(“insert into student values(\”"+name+”\”,”+number+”)”);
After that, run the Sqlstatement program ( in Netbeans, press Shift+ F6). See what happened in you database record. You can see values in your database and table using command :
select * from student;
You can see the value you insert using Sqlstatment class will be in table values.
API for Statement interface in Java can be seen on http://java.sun.com/javase/6/docs/api/java/sql/Statement.html.
source :
http://ferdidolot.wordpress.com/2009/06/18/java-mysql-jdbc-tutorial-using-netbeans-part-2/
Java MySQL JDBC Tutorial using NetBeans Part 1
Java MySQL JDBC Tutorial using NetBeans
Are you asking ‘Could I connect Java application/applet to database like MySQL?’ and the answer is definitely Yes.
You can use JDBC (Java Database Connectivity) to connect your Java application/applet with database. So Let’s start.
First, Create new Project named anything you want, for example Javasql by click File->New Project.
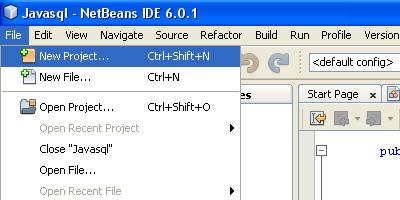
- newProject
then you’ll be on this frame
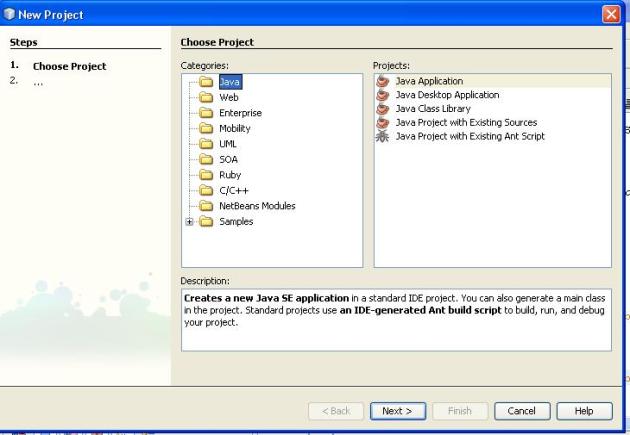
- javaapps
then click next, then give Project Name and set Project Localtion
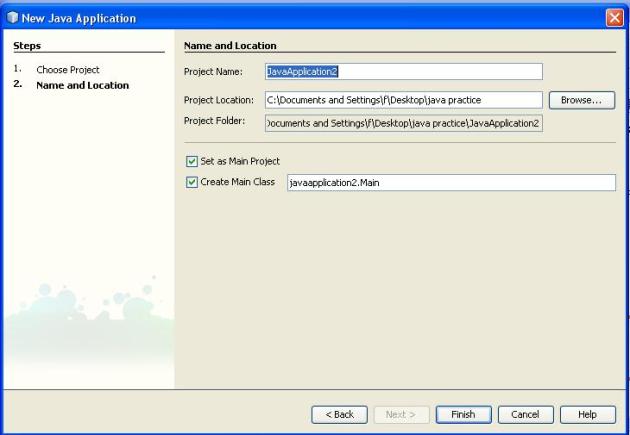
- nameProject
then finish.
Second, you must have JDBC MySQL Driver
before you can start to connect your Java program to database. But since
we use Netbeans , this has been done. Just simply add the library to
your project library. Right click in Library on the Project you use. 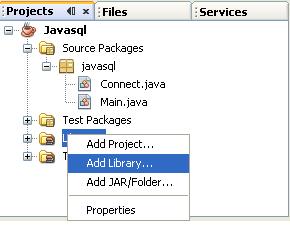

Then choose MySQL JDBC Driver
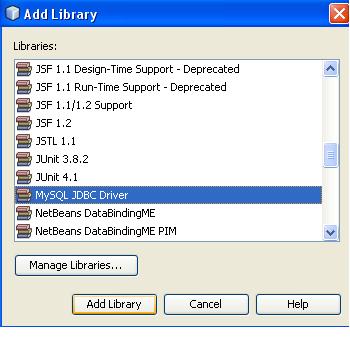
Then Click Add Libary.
So now we can connect to MySQL database. Here is the example how you can connect to MySQL.
Here, we use interface Connection.
package javasql;
import com.mysql.jdbc.Driver;
import java.sql.*;
/**
 *
 * @author Ferdiansyah Dolot
 */
public class Connect {
    public Connect() throws SQLException{
        makeConnection();
    }

    private Connection koneksi;

     public  Connection makeConnection() throws SQLException {
        if (koneksi == null) {
             new Driver();
            // buat koneksi
             koneksi = DriverManager.getConnection(
                       "jdbc:mysql://localhost/databasename",
                       "username",
                       "password");
         }
         return koneksi;
     }

     public static void main(String args[]) {
         try {
             Connect c = new Connect();
             System.out.println("Connection established");
         }
         catch (SQLException e) {
             e.printStackTrace();
             System.err.println("Connection Failure");
         }

    }
}
In example above we create connection to
MySQL from creating object of Driver and get connection from
DriverManager (get Connection will return Connection Object
type), with parameter the url, username, and password. The url above
means the database is located in localhost and the name is
databasename.You can also add port for MySQL so the url looks :
“jdbc:mysql://localhost:3306/databasename”. (See port 3306).
So now we can make a connection to MySQL database. Now, how can we do SQL statement like update, delete, insert, etc?
So now we can make a connection to MySQL database. Now, how can we do SQL statement like update, delete, insert, etc?
Source :
http://ferdidolot.wordpress.com/2009/06/14/java-mysql-jdbc-tutorial-using-netbeans-part-1/
Berkenalan dengan bahasa pemprograman java
Bagi para mahasiswa komputer dan para praktisi IT, tentunya bahasa pemprograman Java sudah tidak asing lagi terdengan ditelinga. Tapi bagaimana dengan orang yang masih awam dengan dunia komputer, khususnya dibidang pemprograman perangkat lunak? baiklah, saya akan ke wikipedia sebentar untuk mencari pengertian bahasa pemprograman java agar anda mengetahuinya
Java adalah bahasa pemrograman yang dapat dijalankan di berbagai komputer termasuk telepon genggam. Bahasa ini awalnya dibuat oleh James Gosling saat masih bergabung di Sun Microsystems saat ini merupakan bagian dari Oracle dan dirilis tahun 1995. Bahasa ini banyak mengadopsi sintaksis yang terdapat pada C dan C++ namun dengan sintaksis model objek yang lebih sederhana serta dukungan rutin-rutin aras bawah yang minimal. Aplikasi-aplikasi berbasis java umumnya dikompilasi ke dalam p-code (bytecode) dan dapat dijalankan pada berbagai Mesin Virtual Java (JVM). Java merupakan bahasa pemrograman yang bersifat umum/non-spesifik (general purpose), dan secara khusus didisain untuk memanfaatkan dependensi implementasi seminimal mungkin. Karena fungsionalitasnya yang memungkinkan aplikasi java mampu berjalan di beberapa platform sistem operasi yang berbeda, java dikenal pula dengan slogannya, "Tulis sekali, jalankan di mana pun". Saat ini java merupakan bahasa pemrograman yang paling populer digunakan, dan secara luas dimanfaatkan dalam pengembangan berbagai jenis perangkat lunak aplikasi ataupun aplikasi berbasis web.
Sumber: id.wikipedia.org
dari referensi diatas, bisa disimpulkan bahwa java adalah bahasa pemprograman yang digunakan untuk membuat aplikasi komputer, aplikasi HP (yang berbasis java) ataupun web. keren bukan? :D. Untuk sekarang ini, java adalah bahasa pemprograman yang paling populer di dunia? wowww.... sebagian programmer di dunia menggunakan bahasa java untuk mengembangkan perangkat lunak hasil kreasi mereka sendiri.
apa siy kelebihannya java?
aplikasi komputer yang dibuat dengan bahasa java bisa jalan di berbagai macam sistem operasi (multi platform). bisa berjalan di sistem operasi windows, linux ataupun mac os. yang lebih menyenangkan lagi adalah, aplikasi java bisa jalan di hp yang mendukung java. :D kereeeeeeeeeeennnnnnnnnn
Subscribe to:
Comments (Atom)